


how to screenshot on Mac- Taking a screenshot on a Mac is one of those things that feels confusing right up until the moment you learn the shortcuts.
Then it becomes almost effortless.
If you have recently switched from Windows, the first surprise is usually that there is no obvious Print Screen key on a MacBook keyboard. But macOS actually gives you more control than a single Print Screen button: you can capture the whole screen, select a precise area, grab just one app window, copy a screenshot directly to the clipboard, choose where screenshots are saved, use a timer, and even record the screen from the same built-in tool.

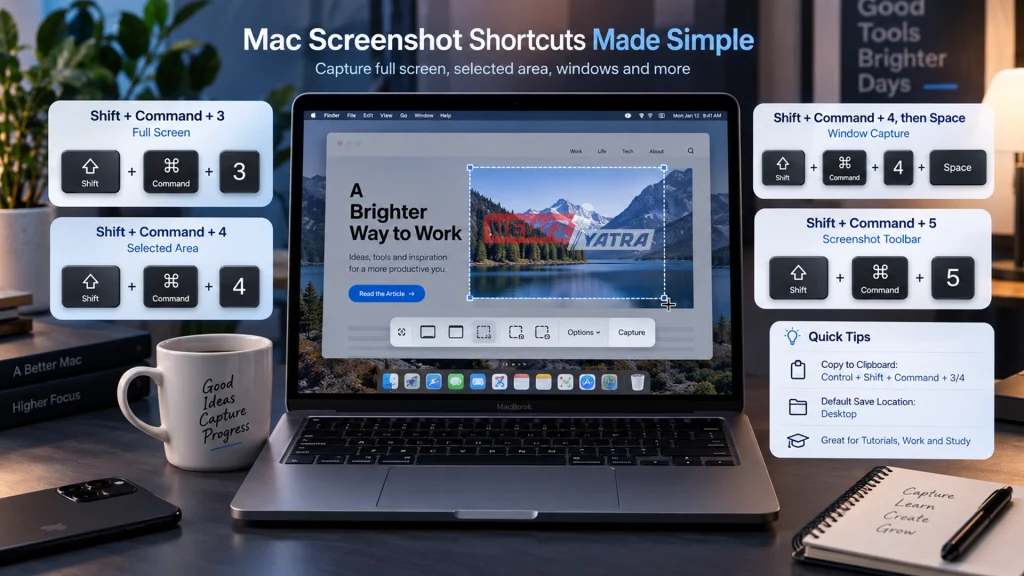
The three shortcuts worth remembering are:
Shift + Command + 3 — capture the entire screen
Shift + Command + 4 — capture a selected area
Shift + Command + 5 — open the full Screenshot toolbar
Those three commands will handle almost everything most Mac users ever need. Apple officially supports these screenshot methods across modern versions of macOS.
But there are a few useful tricks that are easy to miss.
For example, you can capture a clean app window without manually cropping it. You can remove the shadow around that window. You can copy a screenshot without creating a file on your desktop. You can move the selection box after drawing it. And if screenshots suddenly stop working, there are several quick fixes worth trying before assuming something is wrong with your Mac.
This guide covers all of that. (how to screenshot on Mac)
how to screenshot on Mac, Mac Screenshot Shortcuts: Quick Answer
If you only need the shortcuts, save this section.
| What you want to capture | Mac shortcut |
|---|---|
| Entire screen | Shift + Command + 3 |
| Selected part of screen | Shift + Command + 4 |
| One window or menu | Shift + Command + 4, then Space |
| Screenshot toolbar | Shift + Command + 5 |
| Copy full screenshot to clipboard | Control + Shift + Command + 3 |
| Copy selected area to clipboard | Control + Shift + Command + 4 |
By default, screenshots are normally saved to the Desktop. Apple says screenshot files are generally saved as PNG files and include the date and time in the filename.
Now let’s look at each method properly.
1. How to Screenshot the Entire Screen on Mac (how to screenshot on Mac)
This is the closest Mac equivalent to pressing Print Screen on a Windows PC.
Press:
Shift + Command + 3
Press all three keys together and release them.
Your Mac immediately captures everything visible on the screen.
If the floating thumbnail is enabled, you will briefly see a small preview appear in the corner. You can click that thumbnail to edit the screenshot immediately, or simply ignore it and let macOS save the image automatically.
What happens if you use two monitors?
This is something many guides fail to mention. (how to screenshot on Mac)
If multiple displays are connected, Shift + Command + 3 can capture each screen separately, rather than combining everything into one giant image. Tom’s Guide also notes this behavior for connected displays.
That is useful if you work with a MacBook plus an external monitor.
Instead of manually cropping one huge screenshot, you get individual images for each display.
When should you use Shift + Command + 3?
Use it when you want to show:
- your entire desktop
- multiple open apps
- a complete error screen
- your menu bar and Dock together
- a full workspace
- something happening across several windows
If there is private information elsewhere on your desktop, however, capturing only the relevant section is usually safer.
For that, use the next shortcut. (How to Screenshot on Mac)
2. How to Screenshot Part of the Screen on Mac
Press:
Shift + Command + 4
Your normal pointer changes into a crosshair.
Click where you want the screenshot to begin, then drag across the area you want to capture.
Release the mouse or trackpad button.
That selected area is saved as the screenshot. Apple also lets you press Esc before releasing if you want to cancel.
This is probably the most useful Mac screenshot shortcut for everyday work.
Why?
Because most of the time, you do not actually need a picture of your entire desktop.
Maybe you only want:
- one paragraph from a webpage
- part of a spreadsheet
- an error message
- a specific image
- one section of a design
- a chat conversation
- a chart or graph
Capturing only what matters also means you usually do not need to crop the screenshot afterward.
A hidden trick: move the selected area before capturing
Suppose you draw the right-sized selection box but realise it is slightly too far left.
You do not have to start again.
While dragging your screenshot area, press and hold the Space bar.
You can now move the whole selection box without changing its size.
Release Space and continue adjusting if necessary.
Apple includes this behavior in its current screenshot instructions, and it is one of the most useful shortcuts that many Mac owners never discover.
3. How to Screenshot One Window on Mac
You could use Shift + Command + 4 and manually draw a box around a window.
But there is a much cleaner method.
Open the window you want to capture.
Press:
Shift + Command + 4
Then press:
Space
Your cursor changes into a camera icon.
Move it over the window you want. macOS highlights that window.
Click once.
That is it. (how to screenshot on Mac)
The resulting screenshot captures the selected window without including the rest of your desktop. Apple also supports capturing menus this way.
How to remove the shadow from a Mac window screenshot
By default, macOS normally adds a subtle drop shadow around captured windows.
It looks polished, but sometimes you want a cleaner image—for example when preparing:
- website tutorials
- documentation
- presentation slides
- product guides
- UI references
There is an easy trick.
After pressing:
Shift + Command + 4 → Space
hold the Option key while clicking the window.
Apple confirms that holding Option while clicking excludes the window shadow.
That small trick saves a surprising amount of editing.
4. Use Shift + Command + 5 for the Full Screenshot Toolbar
If you only remember one advanced shortcut, make it this one:
Shift + Command + 5
Instead of taking a screenshot immediately, this opens Apple’s built-in Screenshot app toolbar.
It gives you visual controls for:
- capturing the entire screen
- capturing a window
- capturing a selected area
- recording the entire screen
- recording part of the screen
The Screenshot app has been built into macOS since macOS Mojave 10.14.
This method is especially helpful for new Mac users because you do not need to memorise every shortcut.
You can simply look at the controls and choose what you want.
Why Shift + Command + 5 is more powerful
Click Options in the Screenshot toolbar and macOS gives you several additional settings.
Depending on your Mac and macOS version, these include:
- Save to location
- screenshot timer
- floating thumbnail
- mouse pointer visibility
- remembered selection
- recording microphone options
Apple’s current Screenshot app documentation confirms that the Options menu can control save location, timer, pointer visibility and other capture behaviour.
If you take screenshots regularly for work, learning this toolbar is worth the extra minute.
5. How to Copy a Screenshot on Mac Without Saving It
This is one of the most useful Mac screenshot tricks—and one of the easiest to overlook.
Imagine you are replying to a Slack message or writing an email.
You only need to paste the screenshot once.
You do not want another PNG file cluttering your desktop.
Hold Control while using the normal screenshot shortcut.
For the entire screen:
Control + Shift + Command + 3
For a selected area:
Control + Shift + Command + 4
The screenshot is copied to your clipboard instead of simply becoming another desktop file.
Then use:
Command + V
to paste it into a compatible app.
Apple and MacRumors both document this clipboard method.
Where can you paste it?
Depending on the app, you can paste directly into:
- Messages
- Slack
- Notes
- Pages
- Word
- Photoshop
- Preview
- many web applications
This workflow can be much faster than:
take screenshot → find file → drag file → delete file later.
If you send screenshots all day for work, the clipboard shortcut is worth memorising.
6. Where Are Screenshots Saved on Mac?
By default, macOS normally saves screenshots to the Desktop.
The filenames generally look similar to:
Screenshot [date] at [time].png
Apple confirms that screenshots are saved to the Desktop by default unless the save location has been changed.
If you take dozens of screenshots, this can make your desktop messy very quickly.
Fortunately, you can change the location. (how to screenshot on Mac)
How to change where screenshots are saved
Press:
Shift + Command + 5
Then:
- Click Options.
- Look under Save to.
- Choose a location.
Depending on macOS, common options can include:
- Desktop
- Documents
- Clipboard
- Messages
- Preview
- another custom folder
You can also choose another location manually. Apple and Tom’s Guide both document the built-in save-location controls. (how to screenshot on Mac)
A better setup for frequent screenshot users
Create a folder called:
Screenshots
inside Documents or another easy-to-find location.
Then set that folder as your default destination.
Your desktop stays clean, and every screenshot is still easy to find.
7. How to Take a Timed Screenshot on Mac
Sometimes the thing you want to capture disappears the moment you click somewhere else.
Examples include:
- dropdown menus
- hover states
- temporary notifications
- interface controls
- contextual menus
That is when a timer helps.
Press:
Shift + Command + 5
Click:
Options
Then choose the available timer delay.
Apple’s Screenshot app supports delayed captures through its Options menu.
After starting the capture, use the delay to open the menu or position the cursor exactly where you need it. (how to screenshot on Mac)
Then macOS takes the screenshot automatically.
How to Edit a Screenshot Immediately After Taking It
After taking a screenshot, you may see a small thumbnail appear briefly in the corner of the display.
Click it before it disappears.
You can then use Apple’s built-in Markup tools to perform quick edits such as:
- crop
- draw
- add shapes
- add text
- highlight areas
- add a signature
- rotate
- share
Apple specifically supports opening the thumbnail for immediate editing and annotation.
This is convenient when you only need to circle a button or add a quick note.
You do not need Photoshop for every screenshot. (how to screenshot on Mac)
What if you do not want the floating thumbnail?
Press:
Shift + Command + 5 → Options
and turn off the floating thumbnail option.
This can make repeated screenshot workflows feel faster.
How to Screenshot a Menu on Mac
Open the menu first.
Then either:
Shift + Command + 4
and manually select the menu,
or:
Shift + Command + 4 → Space
and use the camera pointer when supported.
Apple explicitly includes menu capture among the Mac screenshot methods.
For tutorials, this can produce a much cleaner result than capturing the entire desktop.
How to Take a Scrolling Screenshot on Mac
This is where things become slightly different.
The standard macOS Screenshot tool is excellent for capturing what is currently visible, but it does not provide a universal one-click scrolling screenshot function for every long webpage or app.
That means Shift + Command + 3 or 4 will not automatically scroll down a long page and stitch it into one giant image.
You have several alternatives. (how to screenshot on Mac)
Option 1: Save the full webpage as a PDF
If you simply need the complete page—not necessarily a PNG image—this is often the cleanest method.
In Safari, you can use the browser’s print/export options and save the webpage as a PDF.
This preserves far more content than manually taking multiple screenshots.
It is especially useful for:
- invoices
- articles
- research
- receipts
- web documents
- long reference pages
Option 2: Use browser full-page capture tools
Some browsers and browser extensions offer full-page capture features that automatically scroll through a page and create one long image.
The exact process varies by browser.
If you install an extension, use a reputable one and review its permissions because screenshot tools may be able to access webpage content. (how to screenshot on Mac)
Option 3: Take multiple screenshots
For sensitive pages where you do not want to use a browser extension, simply use:
Shift + Command + 4
to capture consecutive sections.
It is less elegant, but it keeps everything inside macOS.
How to Screenshot on MacBook Air
There is no special screenshot process for MacBook Air.
Use the same shortcuts:
Shift + Command + 3 — full screen
Shift + Command + 4 — selected area
Shift + Command + 5 — Screenshot toolbar
The same applies across modern MacBook Air models running macOS.
How to Screenshot on MacBook Pro
MacBook Pro uses the same shortcuts.
Again:
Shift + Command + 3
Shift + Command + 4
Shift + Command + 5
Older MacBook Pro models with a Touch Bar also supported Shift + Command + 6 to capture the Touch Bar. Apple’s Mac User Guide continues to document the Touch Bar capture shortcut where applicable. (How to Screenshot on Mac)
Can Mac Take HDR Screenshots?
On supported Mac models running macOS Tahoe 26 or later, Apple’s Screenshot app can provide a choice between compatible SDR capture and HDR capture.
Apple says:
SDR / Most Compatible uses PNG.
HDR uses HEIF.
This is a relatively new screenshot option and will not appear on every Mac or older version of macOS.
For most people sharing screenshots through websites, email or documentation, SDR/PNG remains the safer compatible choice.
HDR may be useful when preserving high-dynamic-range visual information matters.
Mac Screenshot Not Working? Try These Fixes
If the screenshot shortcut suddenly stops working, do not assume your keyboard is broken.
Try these steps. (How to Screenshot on Mac)
1. Check the screenshot keyboard shortcuts
Open:
Apple menu → System Settings → Keyboard → Keyboard Shortcuts → Screenshots
Make sure the relevant shortcuts are enabled.
Apple confirms that screenshot keyboard shortcuts can be customised from Keyboard settings.
2. Try Shift + Command + 5
Even if another shortcut is not responding, open the Screenshot app directly with:
Shift + Command + 5
If the toolbar appears, the underlying screenshot feature is working.
You can also find Screenshot inside:
Applications → Utilities
according to Apple.
3. Check where screenshots are being saved
Sometimes screenshots are working perfectly—you simply cannot find them.
Press:
Shift + Command + 5 → Options
and check the current Save to location.
Someone may have previously changed it from Desktop to Documents or another folder.
4. Restart the Mac
If macOS shortcuts behave strangely, a simple restart can clear temporary problems.
Save your work first, restart, and test the screenshot shortcut again.
5. Check whether the app blocks screenshots
This is important.
Apple notes that some apps may prevent screenshots of protected content. The Apple TV app is one example Apple specifically mentions.
So if screenshots work everywhere except one video or protected app, macOS itself may not be the problem. (how to screenshot on Mac)
6. Test another keyboard
If none of the shortcuts work, check whether your Shift, Command or number keys are functioning properly.
Try the keys in other shortcuts or use an external keyboard temporarily.
How to Change Mac Screenshot Keyboard Shortcuts
You are not necessarily stuck with Apple’s default combinations.
Go to:
Apple menu → System Settings → Keyboard → Keyboard Shortcuts → Screenshots
From there, macOS allows you to review or customise screenshot-related shortcuts.
For most users, however, I would keep the defaults.
They are widely documented, work consistently across Macs and are easier to remember when switching devices. (How to Screenshot on Mac)
Screenshot vs Screen Recording: Which One Do You Need?
A screenshot captures a still image.
A screen recording captures movement.
If you are trying to explain:
“Click this button”
a screenshot is usually enough.
If you are trying to demonstrate:
“Click this, wait for the panel to open, drag this item, then choose this option”
a screen recording can be much clearer.
Press:
Shift + Command + 5
and you will see recording options alongside screenshot controls.
Apple’s Screenshot tool supports recording the entire screen or a selected portion.
This is useful for:
- tutorials
- bug reports
- software demonstrations
- presentations
- training
- customer support
Best Screenshot Method for Different Situations
Here is the simplest way to decide.
Need everything visible?
Use:
Shift + Command + 3
Need only part of the screen?
Use:
Shift + Command + 4
Need one clean application window?
Use:
Shift + Command + 4 → Space
Need advanced controls?
Use:
Shift + Command + 5
Need to paste the screenshot immediately?
Add:
Control
to your screenshot shortcut.
Need a long webpage?
Use a browser full-page method or save it as PDF rather than expecting the standard Screenshot app to scroll automatically. (How to Screenshot on Mac)
Need to show movement?
Use screen recording through:
Shift + Command + 5
Mac Screenshot Shortcuts You Should Actually Remember
You do not need to memorise ten combinations.
For most users, four are enough:
Shift + Command + 3
Entire screen.
Shift + Command + 4
Selected area.
Shift + Command + 4, then Space
Specific window.
Shift + Command + 5
All advanced screenshot and recording controls.
Everything else is an optional power-user trick.
Frequently Asked Questions
How do you screenshot on a Mac?
Press Shift + Command + 3 to capture the entire screen. Use Shift + Command + 4 to capture a selected area. (how to screenshot on Mac)
What is the Mac equivalent of Print Screen?
The closest equivalent is Shift + Command + 3, which captures the full screen.
How do I screenshot only part of my Mac screen?
Press Shift + Command + 4, then drag around the area you want to capture and release.
How do I screenshot one window on Mac?
Press Shift + Command + 4, then press Space. Click the window when the cursor becomes a camera icon. (how to screenshot on Mac)
How do I screenshot without the window shadow?
Use Shift + Command + 4 → Space, then hold Option while clicking the window.
Where do Mac screenshots go?
By default, screenshots are normally saved to the Desktop. You can change the destination through Shift + Command + 5 → Options.
How do I copy a screenshot instead of saving it?
Hold Control while taking the screenshot. For example:
Control + Shift + Command + 3
copies the full screen to the clipboard.
How do I paste a Mac screenshot?
If you copied it to the clipboard, press Command + V in a compatible app.
Can I take a scrolling screenshot on Mac?
macOS’s standard Screenshot app does not provide a universal scrolling screenshot for every app or webpage. For long webpages, a browser full-page capture feature, extension or PDF export is usually better. (How to Screenshot on Mac)
How do I change screenshot location on Mac?
Press Shift + Command + 5, choose Options, then select your preferred save location.
How do I edit a screenshot on Mac?
Click the floating thumbnail immediately after taking the screenshot. You can crop, annotate, draw and share from the built-in preview. (How to Screenshot on Mac)
Why is Shift + Command + 4 not working?
Check System Settings → Keyboard → Keyboard Shortcuts → Screenshots and verify that screenshot shortcuts are enabled. Also check whether the app you are trying to capture blocks screenshots. (How to Screenshot on Mac)
Can I screenshot Netflix or Apple TV content?
Some protected media apps may restrict screenshots. Apple specifically notes that certain apps, including Apple TV, might prevent screenshots of their windows.
How do I record my screen on Mac?
Press Shift + Command + 5, then choose one of the screen-recording options.
How do I take a screenshot on MacBook Air?
Use the same Mac shortcuts: Shift + Command + 3 for the full screen, Shift + Command + 4 for an area, or Shift + Command + 5 for the Screenshot toolbar. (How to Screenshot on Mac)
How do I take a screenshot on MacBook Pro?
The same shortcuts work on modern MacBook Pro models.
Final Takeaway
You really only need three shortcuts to become comfortable taking screenshots on a Mac.
Shift + Command + 3 captures everything.
Shift + Command + 4 lets you choose exactly what you want.
Shift + Command + 5 opens the full Screenshot tool when you need more control.
Once those become muscle memory, the extra tricks make the workflow even better.
Add Control when you want to copy instead of save.
Press Space after Shift + Command + 4 when you want one clean window.
Hold Option if you do not want the window shadow.
Use the Screenshot toolbar when you need a timer, custom save location or screen recording.
And if you cannot find a screenshot, check the save destination before assuming it failed.
The Mac does not have a key labelled Print Screen.
It does not really need one.
Once you know the shortcuts, capturing exactly what you want is faster than hunting for a dedicated button.
How to Check Ration Card Status Online in India


